

S’mores: Graham Cracker Cake filled with Marshmallow fluff and Topped with Smoked Chocolate Ganache
More to come…
S’mores: Graham Cracker Cake filled with Marshmallow fluff and Topped with Smoked Chocolate Ganache
More to come…
One of my resolutions for 2013 is to be more productive. So far, I’ve attempted to bake and it’s only the 6th. YAY, me! A couple of months ago, I picked up a bag of smoked chocolate chips from Hot Cakes Molten Chocolate Cakery in Ballard. I’ve had it in my mind to redo a S’mores Cupcake using the chips and finally got around to trying it today.
I realize that a S’more isn’t smoked…The chocolate just reminded me of a campfire. I also wanted to get the impression of a S’more without reproducing a Trophy Cupcake. (I also need a new pastry torch…so I can’t toast the tops without holding them under the broiler.) My plan was to make a graham cracker cake, fill it with marshmallow fluff and top it with whipped chocolate ganache that I made from the smoked chocolate. I thought that this would be the right order…graham cracker on the bottom, chocolate on the top, liquid-y marshmallow to squirt out from the middle to get your fingers all sticky…all with the faint hint of smoke in the back ground.
I failed in my selection of a graham cracker cake recipe. When I first looked at the recipe I chose, I thought that it would result in a light cake that would be easy to fill with the marshmallow fluff. I was torn between this recipe and a recipe for graham cracker pound cake, which I thought would be more like a graham cracker…dense and heavy…
When I try this again later in the week, I will go for the graham cracker pound cake…The cake ended up overly fluffy…a result of 1 tablespoonful of baking powder AND 3 stiffly beaten egg whites. I should have known.
My friend Mrs Smith was in town from the South last week. On her list of “things to do in Seattle” was “take a ferry somewhere”, so we went to Whidbey Island. The day was absolutely beautiful: sunny and hot for Seattle (mid 70’s). We wandered around Langley for a bit and had lunch at Useless Bay Coffee Company, which turned out to be very vegetarian friendly (for me) and gluten free friendly (for Mrs Smith). At the Whidbey Island visitor’s center, we picked up a flyer for Whidbey Cupcakes, so with high hopes of gluten free goodness, we went there for dessert.
Unfortunately for Mrs Smith, the cupcake cafe had run out of their Choochokam cupcake, a gluten free Ghiardelli chocolate cake topped with Madagascar vanilla and organic chocolate butter cream, so she ate some M&M’s while I had my cupcake.

Unfortunately for me, I might have chosen the wrong cupcake. I decided on the Double Bluff: a Ghiardelli chocolate butter cake topped with a caramel butter cream frosting and garnished with black Hawaiian sea salt, caramel drizzle, and a Dove caramel candy. The frosting was quite delicious. It had the silky texture of a meringue butter cream and the sea salt added a nice salty contrast and a little crunch. The cake, however, was not so delicious: it was very dry and crumbly. I was disappointed. I’ll try a different flavor if I’m ever in the area again…
First, I have to say that I LOVE my new kitchen!
 It’s quite a change from my previous kitchen, as seen here .
It was definitely easier to bake in the new kitchen. Mr Shuck could actually come into the kitchen with me. I didn’t have every available counter space covered in baking stuff. An added bonus: all of my stuff fits in the kitchen, so no trips up and down the basement stairs retrieving supplies.
So, I’ve been wanting to attempt a naturally tinted Red Velvet cake since I first started baking. I have never enjoyed Red Velvet because I’ve always felt like I could taste the red dye. Maybe it was all in my head.
I would like to say that I figured this all out for myself, but I wasn’t willing to invest that sort of time for my first baking project in months. Fortunately, Jamie over at Sophistimom had already done the research for me.
For the most part, I followed her recipe, but made a few minor changes: Someone who commented on her post recommended using buttermilk instead of cream cheese, which I did. Many of the comments were that the cake was very dense and I was hoping for something lighter. I thought that swapping out a liquid for a semi solid would help with that. Buttermilk is also pretty acidic, so I thought that would help keep the beets bright. I also ended up with only 1 cup of beet puree from my bunch of beets. I did not use her cream cheese icing recipe. Traditional Southern Red Velvet cake is topped with a light and fluffy icing that’s made with a base of cooked flour and milk (like gravy) that’s mixed into whipped butter and sugar. I first used it to make a lighter cream cheese icing here and later in my Caramel Popcorn cupcakes.
Sophistimom’s All Natural Red Velvet Cake, modified
3 medium-ish beets (which resulted in 1 cup of puree)
3 tablespoons fresh lemon juice
1 tablespoon apple cider vinegar
2 sticks, unsalted butter @ approximately room temperature
2 & 1/3 cups sugar
1 cup buttermilk
4 eggs
1 & 1/2 teaspoons vanilla extract (homemade)
2 cups whole wheat pastry flour
1 and 1/2 heaping teaspoons baking POWDER
1 and 1/2 teaspoons kosher salt
2 heaping tablespoons Hershey’s natural cocoa
1 recipe “gravy” frosting
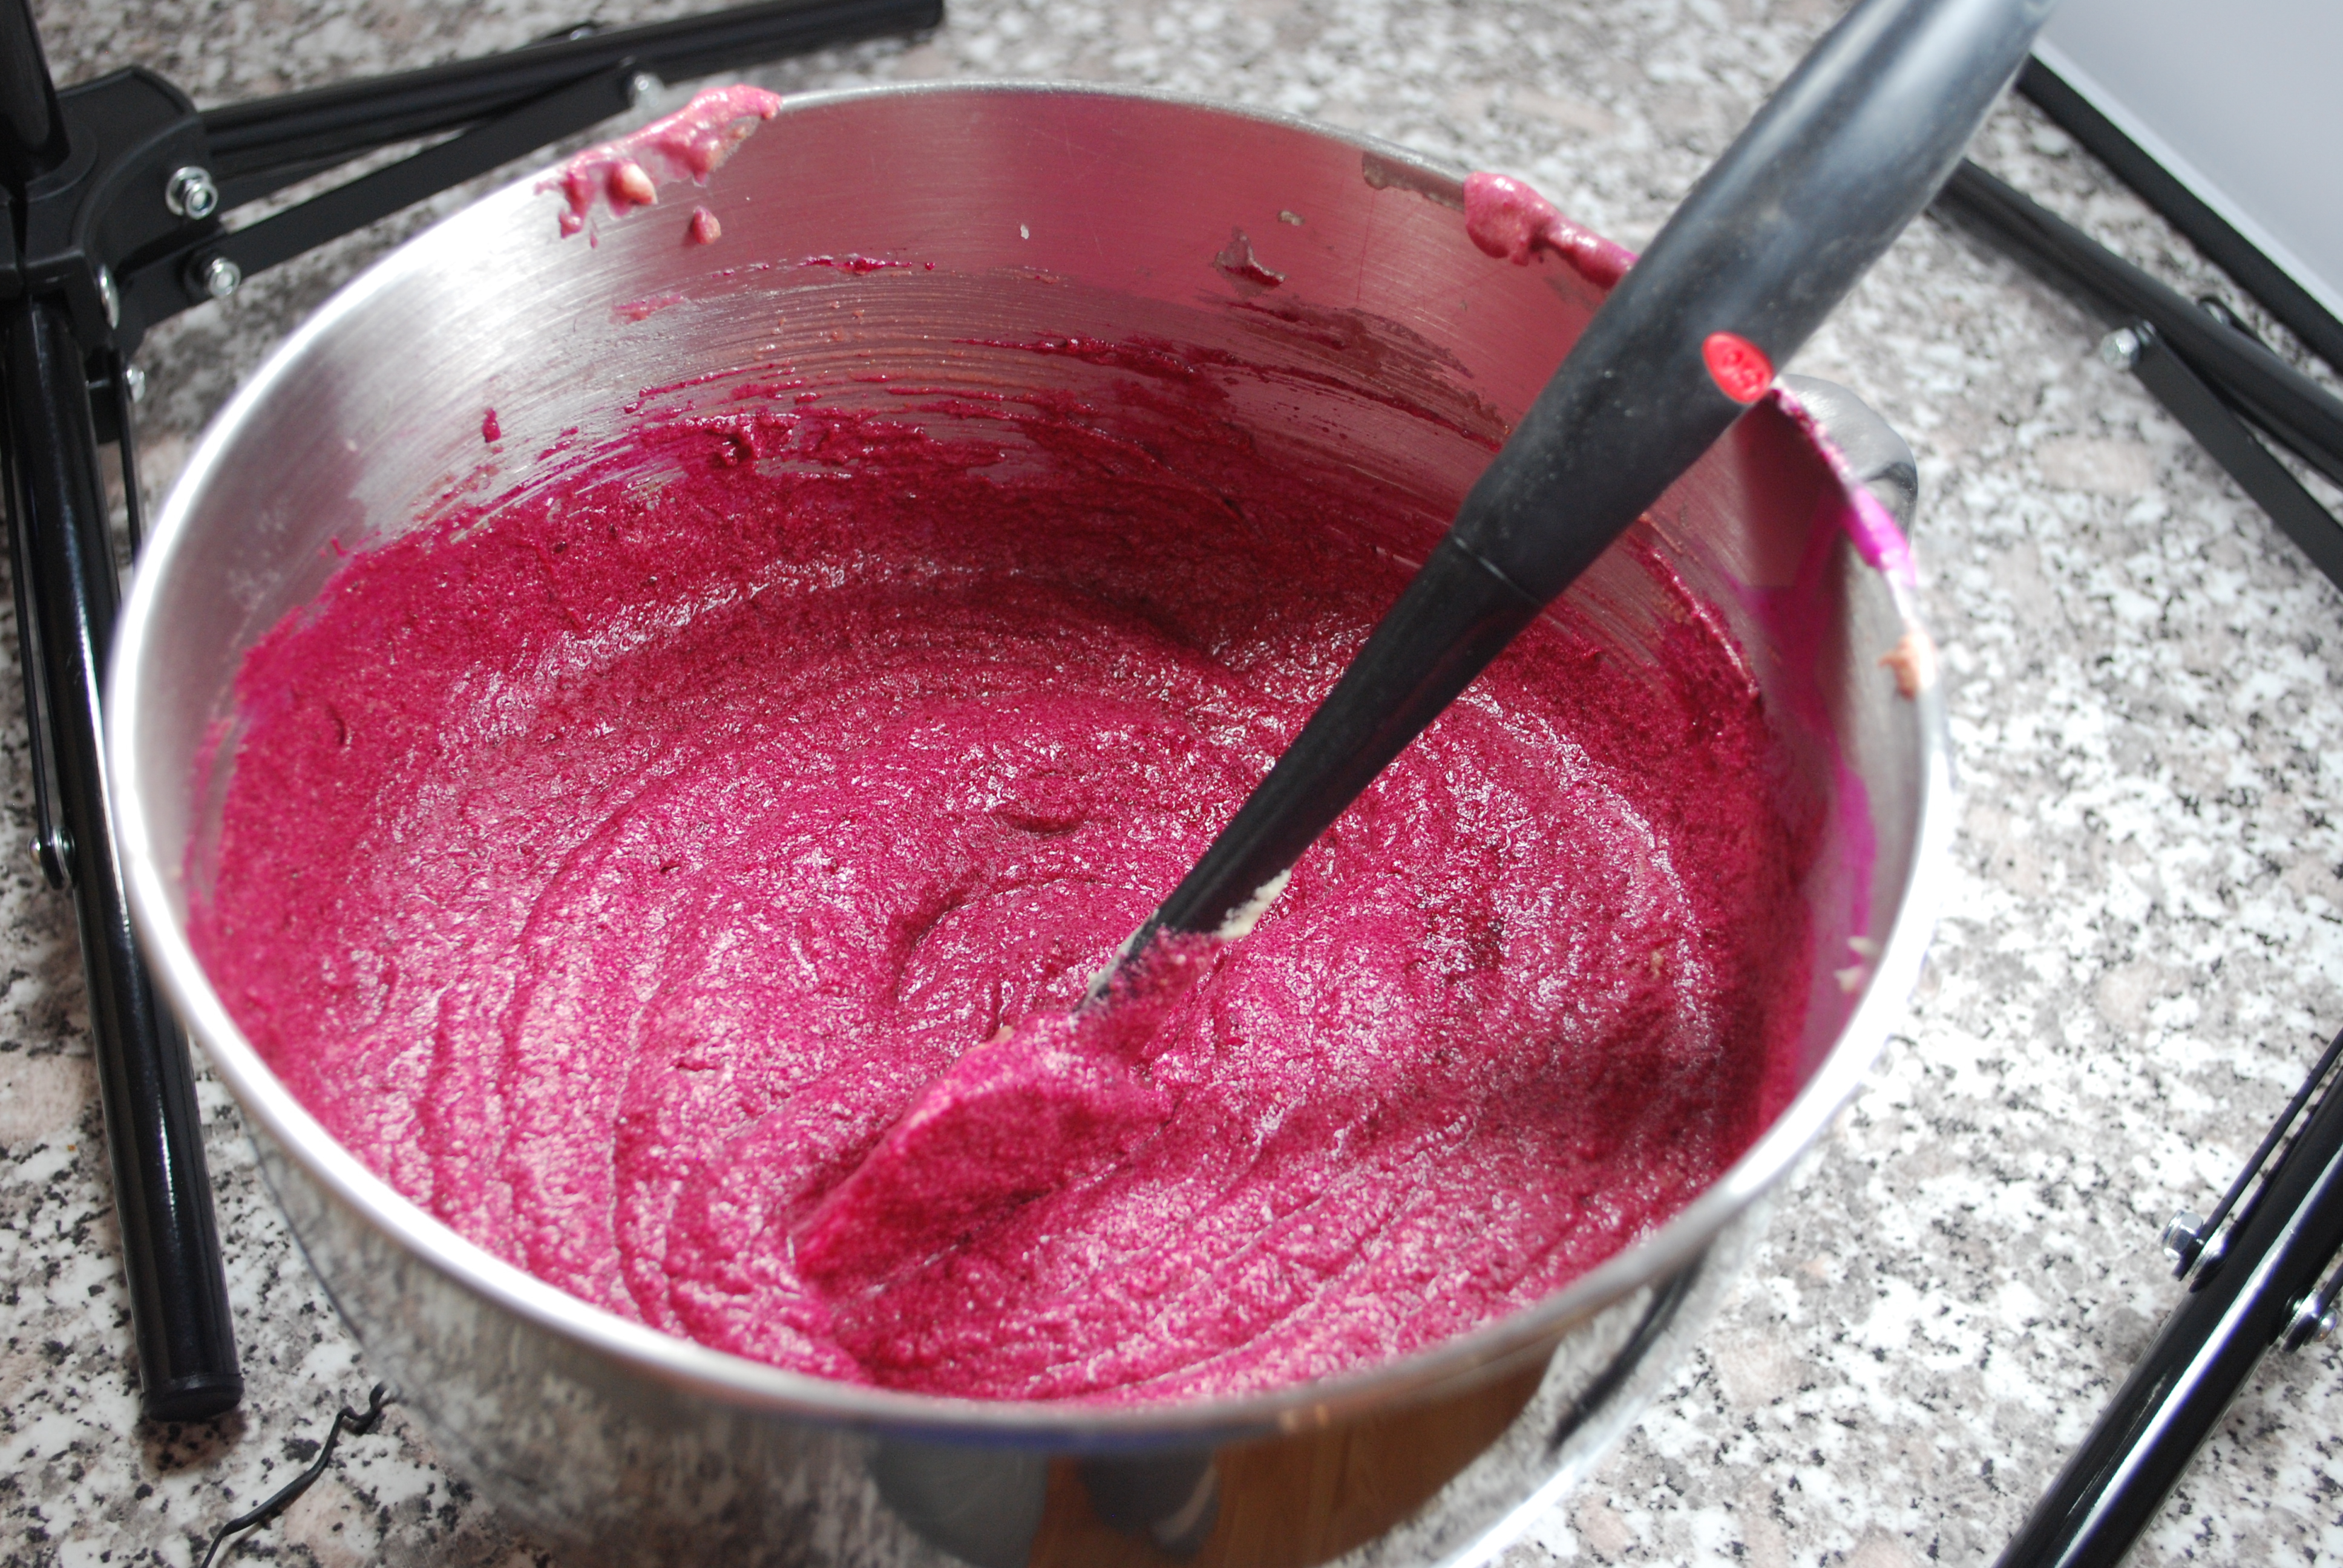
Sophistimom’s recipe instructed me to “Preheat oven to 350 degrees (165 degrees celsius). Place beets in a small baking dish and add a 1/2 cup of water. Cover with parchment paper and foil, and roast until quite tender, about 60-90 minutes. Allow to cool completely.” I didn’t want to wait around the house for an hour or two, so I wrapped the beets in some foil, dumped them into a mini crock pot, and went furniture shopping for 4-5 hours. When we returned the beets were very tender. After the beets cooled, I chopped them up and put them in the blender with the lemon juice and vinegar and pureed until smooth.
Next, I preheated the oven and started setting out liners in mini cupcake pans. While the oven preheated, I creamed together the butter and sugar using the paddle attachment on my Kitchen Aid. After it was nice and fluffy, I added the eggs one at a time.
While the wet mixture was going, I mixed together the flour, baking powder, salt and cocoa. I also poured the buttermilk in the messy blender (after removing the beets) and ran it for a few seconds to get more of the beet pulp out of the blender.
I alternated adding the dry ingredients to the mixer bowl with the now bright pink buttermilk. After this was mixed thoroughly, I added the beet pulp and mixed by hand until uniform.
I added the batter to the tins using a little scoop. Initially, I filled them up only 2/3 full as I didn’t know how much they would rise.

The 2/3 full batch didn’t rise very much…
I unwrapped all of the short ones and have thrown them into the freezer. I’ll make cake pops out of them one day soon.
I’m not really familiar with my oven yet. I thought I set the timer for 15 minutes, but apparently didn’t. I think they baked for about 15 minutes or until the tops sprang back when poked with my finger.
For the icing:
3 tablespoons all purpose flour
1 cup milk
2 sticks unsalted butter (room temperature)
1 cup superfine sugar
Mix the flour and milk in a saucepan with a whisk until flour is dissolved. Heat over medium high heat until mixture thickens (about 10-15 minutes). Remove from heat and pour into a bowl, cover with waxed paper (or plastic that doesn’t melt) and allow to cool to room temperature, then cool in refrigerator.
Beat the butter well until fluffy using the whisk attachment. (I actually ended up adding about 1/2 of a container of whipped cream cheese…to get it out of the frig). Add the sugar and beat on medium high speed for 6 minutes (or until white and fluffy and sugar is dissolved).
Add the cooled “gravy” to the butter mixture and whip until well combined and fluffy.
 I’ll be distributing these at work on Monday and hope to provide feedback afterwards. I’m pretty happy with the way they turned out, especially since I haven’t baked in a LOONG time.
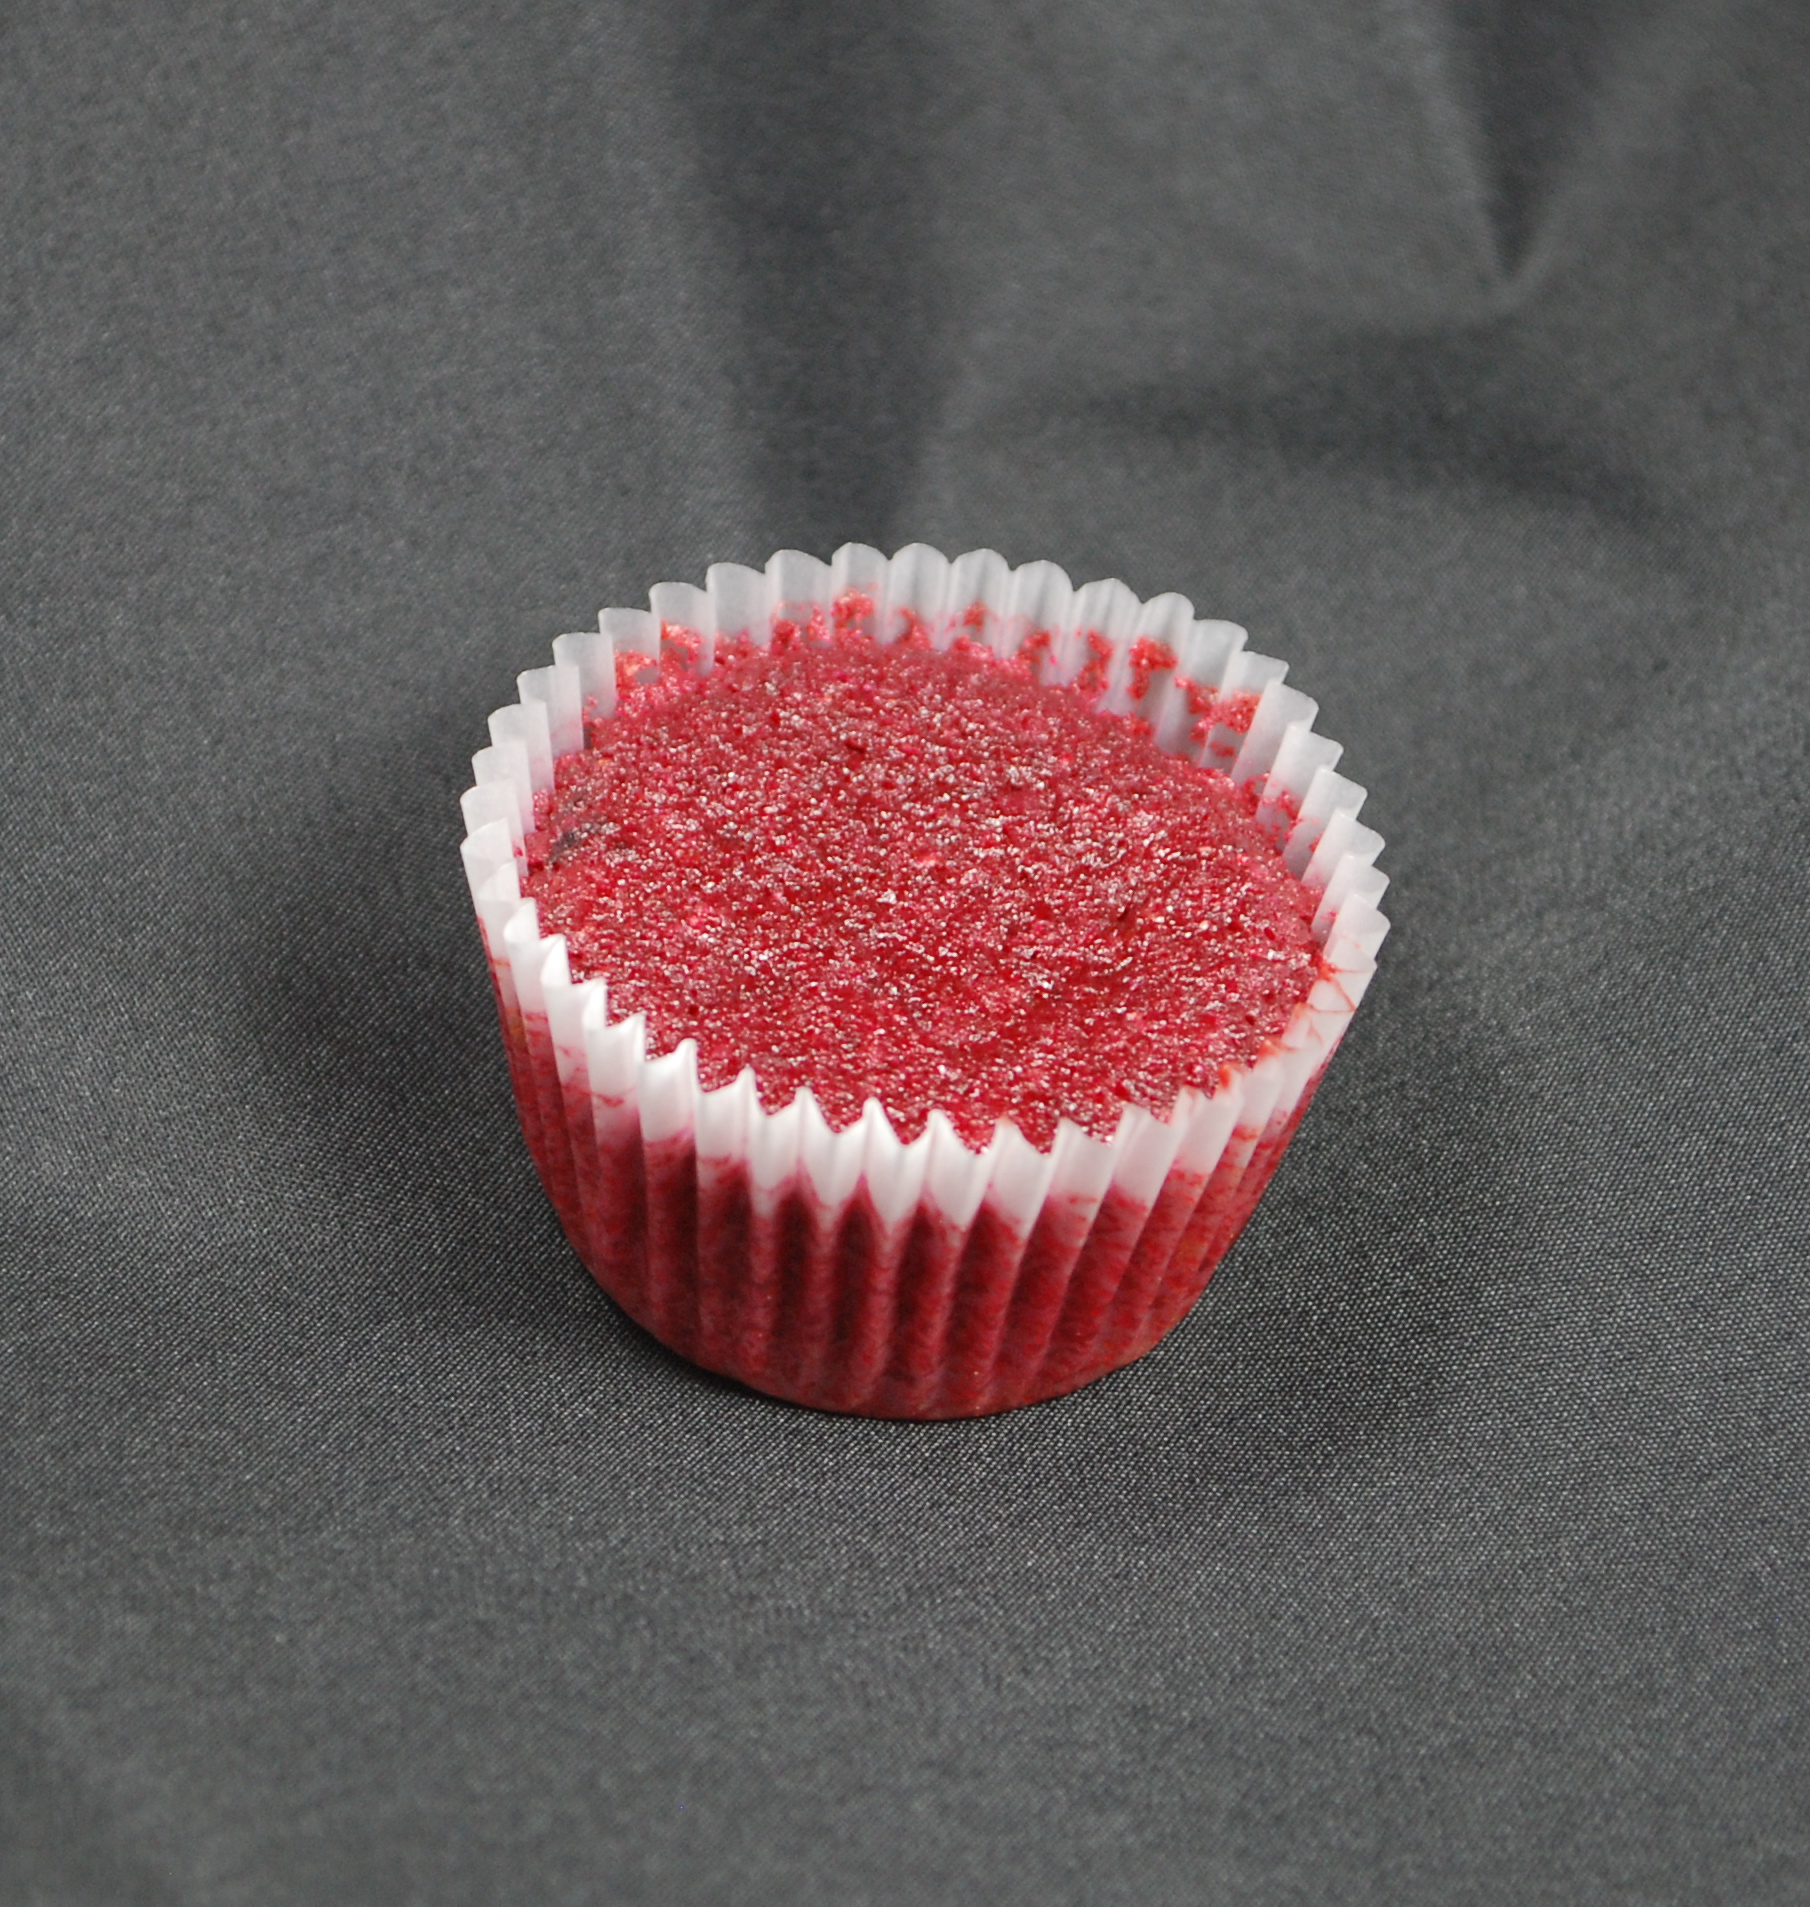
Thanks again to Sophistimom for all of her work! The cake turned out really moist and fluffy. Without the icing, it has a slight “earthy” taste from the beets, but is still very good and definitely very colorful. I’m not sure if it’s red, purple or magenta, but it’s pretty!
So…the new kitchen is unpacked. The rest of the house…not so much. I have a recipe picked out to hopefully bake this weekend.
I have a new project in mind and have a book on hold at the library that might be an inspiration. It may turn out to be impossible, but here’s a clue…
Thanks to Mr Tzau for bringing me a cupcake from Cake Envy in Greenlake. I took no pictures as I was at work. It was pretty. It was delicious. Moist almond cake, which apparently contained ground almonds. It was very light and flavorful and the icing, which seemed to be a vanilla Italian meringue butter cream, was delicious. Cake Envy is sustainable, all natural and organic. I am looking forward to visiting the shop!
So…
We’ve been looking for a new house…since September…
In an attempt to make my house look more spacious, I packed up all of my baking supplies.
We think we have found a house. Price agreed upon. Inspection was yesterday. Hopefully, we will close at the end of February and move in March! Fingers crossed.
This is the kitchen I will be leaving…

Western side of the kitchen

Eastern side of the kitchen
We will (if all goes well) have a kitchen that 2 people can comfortably move around in. We will be able to put something in the frig if the dishwasher is open. I’ll be able to store my baking supplies IN THE KITCHEN!
It seems like Z has recently been for ZERO cupcakes in production. Today Z is for Zero candy bar. Hershey’s website describes the Zero bar as a “unique combination of caramel, peanut and almond nougat covered in delicious white fudge”. The ingredient list is a bit longer: SUGAR; CORN SYRUP; VEGETABLE OIL (PALM KERNEL AND PALM OIL); NONFAT MILK; SOY PIECES; PEANUTS; CONTAINS 2% OR LESS OF: COCOA; MALTED MILK (BARLEY MALT EXTRACT; WHEAT FLOUR; MILK; SALT; SODIUM BICARBONATE ); PEANUTS; ALMONDS (ROASTED IN COCOA BUTTER AND/OR SUNFLOWER OIL); SALT; ARTIFICIAL COLOR; SORBITAN TRISTEARATE; EGG WHITES; SOY LECITHIN; HYDROLYZED SOY PROTEIN; ARTIFICIAL FLAVOR; MONO- AND DIGLYCERIDES . I love me some glycerides. YUM!

Zero Bar image stolen from Wikipedia
It’s been decades since I had a Zero bar, so I thought I’d refresh myself on the flavor. Not as easy as you might think. Mr Shuck finally found one for me at a Rite Aid. I must say that it really wasn’t worth all the time it took to find. The flavor was what you’d expect from the ingredient list above. It was a little waxy and very sweet.

Zero Bar interior
I thought these had whole almonds on top…apparently at one time they did, when they were produced by the Hollywood Candy Company. Now that they are produced by Hershey’s, they seem to just have some almond crumbs mixed in with the nougat. After looking at the ingredient list (which I did after making the cake balls), I wished that I had known about the malted milk soon enough to incorporate that into this somewhere. Oh, well!
I chose to make a cake ball for a couple of reasons: 1. It was fun last time. 2. We are hoping to put our house on the market soon, so I’ve put a bunch of stuff into storage. (To make my tiny house seem spacious and roomy.) Apparently cupcake wrappers are in a box somewhere… and I didn’t want to buy new ones…
The cake ball started with an almond cake recipe that I found on the Odense website. I had a tube of marzipan lying around and wanted to use it for something. The cake recipe called for almond paste, not marzipan, so I adjusted it a little. Marzipan has a lower percentage of almonds (28%) than almond paste (45%) so contains more sugar. I also knew that my nougat frosting was going to be incredibly sweet, so I wanted to use a bit less sugar. The only pan that I haven’t packed up was a rectangular spring form, so I used that instead of a tube pan and reduced the baking time. I replaced some of the flour with almond meal as well.
Ingredients for cake:
Directions:

Almond Cake with a bite removed for tasting
I found a recipe for nougat icing at FoodTV.com and altered it only slightly by using 1/2 almond butter and 1/2 peanut butter. I bought smooth butters and decided that crunchy would be better, so I smashed up some sliced almonds and added them in also.
Icing:
Combine 1 large (16 oz) jar of marshmallow creme or fluff with 1/8 cup peanut butter and 1/8 cup almond butter and beat with electric mixer until combined. Mix in about 1/4 cup crushed almonds.

Nougat Icing
Assembly of cake balls: Wearing disposable gloves, I broke up the cake into crumbs then worked the icing into the crumbs. (FYI: marshmallow fluff is VERY STICKY. See Yam Casserole post.) Form mixture into balls and place on parchment lined cookie sheet. (I placed these in the freezer, but would just refrigerate them if I were to do it again…keep reading…)
While the cake balls were solidifying in the freezer, I attempted to make caramel. I have made caramel a few times before using sugar, water, cream and butter, but I saw a recipe that called for sweetened condensed milk which said it was faster. I should always do what I know….

Burnt Caramel
A couple of days later when I had another day off, I made caramel candy using the recipe I was used to.
I combined 3 tablespoons water with 1/4 cup corn syrup and 1 cup of sugar in a pan over medium heat. While I was bringing it to a boil, I warmed 3/4 cup cream and 1/4 cup butter in the microwave. When the sugar mixture reached 320 degrees, I slowly added the cream mixture. You have to be really careful with this as the mixture will SERIOUSLY bubble over. I returned the mixture to 240 degrees, then removed it from heat and put the pan in a bowl of water to cool it off a bit. I think my thermometer may be a bit off as the sugar syrup was a bit too light when I added the cream.
I don’t know the best method to recommend for coating the cake balls with the caramel. I tried dunking them in, but that made a sticky mess. I dropped one in and the cake ball got a bit too soft from the heat. Since the cake balls were frozen, the caramel solidified too quickly and didn’t want to stick. I ended up putting the tray of cake balls in the oven to defrost for a few minutes, then spooned the caramel over them. These weren’t completely covered with caramel so were easier to move around. (All of this was way too sticky for me to photograph myself and Mr Shuck was at work, so no photos of the process.)
I put the caramel covered balls back into the freezer (as there is no room in my frig) while I melted some white chocolate bars for the coating. I chose to use commercial white chocolate bars because I thought straight white chocolate would be too soft for coating.

I broke the chocolate into squares and placed it in a medium metal mixing bowl that I placed over boiling water. (Actually boiling barley, which I was cooking to put into chili.) Again, I struggled with coating the balls with the melted chocolate. Dunking them completely looked nice at first, but then I had to get it off the skewer I was using and that made a mess. I tried just holding them with 2 fingers and covering them with chocolate with a spoon, but that was awkward as well when I tried to put them down on the cooling rack. (Cake pops would have been best, but those involved lollipop sticks which were packed up with the cupcake wrappers. Poor planning on my part.) Finally, I decided to just spoon the chocolate on top of the solidified caramel. I garnished them at first with multiple sliced almonds, but ended up just using one sliced almond on top. (Hershey’s has gotten rid of the almond on top altogether…)

Zero Cake Ball, covered with almonds

Zero Cake Ball, simplified
There’s a new cupcake shop in West Seattle! (Editor’s note: I didn’t realize that I never published this post…not so new anymore…and not in my neighborhood.)
Stuffed Cakes is located on 35th Ave SW between Henderson and Barton. It’s conveniently located between a new fish and chips shop (West Seattle Fish House) and a coffee shop. It is also blessed with 3 parking spaces out front (one of them for loading/unloading), so it seems like it will be easy to stop in and see what’s available.
I stopped in yesterday (for their soft opening) and picked up a few cupcakes. Hopefully when they get busier, they will have a larger selection. Right now, they are just selling whatever flavors they may have had a special order for. There were 3 choices available and I bought one of each: a gluten free Mexican Chocolate, an Orange Dream, and Nothing Rhymes with Orange.

Gluten Free Mexican Chocolate
I wouldn’t have known this cupcake was gluten free if I hadn’t been told. (Actually, I forgot which one the owner said was gluten free and had to call back and ask!). The chocolate cake was fluffy and moist with just a hint of cayenne. The chocolate could have been a little bit stronger, but I could have eaten the cake by itself. The icing had a distinct cinnamon flavor which wasn’t overpowering and it was light and not overly sweet. I would go back for this cake again!

This cupcake wasn’t my favorite, but it was good. I don’t really care for the orange/vanilla combination, but that’s a personal preference. Mr Shuck really liked it. The tie-dye styled icing was attractive and was definitely orange flavored. The cake was moist and had a nice texture.

Nothing Rhymes with Orange: ExteriorNothing Rymes with Orange: Interior
This cake was essentially the same as the other orange, with the addition of bittersweet chocolate ganache in the center. I would have been happier with a little more ganache (Who doesn’t love more chocolate?!). I think Mr Shuck would ask for one again.
I’m excited about this new shop in my neighborhood. It’s a plus that it’s on the right-hand side of the road on my trip from home to Target. There is a little strip for parking. AND most importantly: They have really good cupcakes!
Before you read this, I have to warn you that this is going to be sticky….

Sweet Potato Casserole stolen from Southern Living.
I have never liked Sweet Potato casserole…mainly because I don’t like yellow sweet potatoes or yams. (Unless they they are made into french fries.) Before we moved to Washington, I wasn’t even aware that there were white sweet potatoes, which I don’t mind, but don’t crave. Back to the topic: My family always had Sweet Potato casserole at Thanksgiving and Christmas. Mr Shuck says that it was more like a dessert anyway, with the brown sugar and nuts and marshmallows.
The most important elements to me were the brown sugar, marshmallow, and of course, the yams.
I started with a sweet potato cake recipe that I found at Epicurious and adapted it only slightly.
Preheat the oven to 350 degrees and fill one pan of mini muffin tins with liners.
In a medium bowl, combine the flour, leaveners and salt. In a larger mixer bowl, combine the yams with sugar and oil and beat until smooth. Add the eggs one at a time, mixing well after each addition, then add the vanilla. Add half of the dry mixture and mix just until combined, then add the other half. Fold in the pecans. Scoop into prepared pans using a 1/2 ounce scoop. Bake for approximately 14 minutes. Yields 72 mini cupcakes.
When I have multiple pans to bake, I fill one pan, then put it into the middle of the oven. I set the timer for 1/2 of the recommended time and let the first pan bake while I fill the second pan. I rotate the first pan over to the side of the oven and put the second pan in. I let both pans bake for the other 1/2 of the recommended time, then take out the first pan, moving the second pan into the center of the oven. I had to let the pans cool so the 3rd pan baked by itself.
Sweet potato casserole normally has mini marshmallows baked on top, but marshmallows are not vegetarian since they contain gelatin. Instead I was going to make a Swiss meringue, which tastes essentially like a marshmallow, but then I read on someones baking blog (can’t find it now!) that she likes to use straight marshmallow fluff as an icing. I took this easy way out. I wouldn’t do it again….

Beautiful Fluff star, immediately after piping

Piped Fluff a minute later

And a few more minutes later...
I hoped that toasting the Fluff might stabilize it a bit… I was right. I should have had them ready to go under the broiler as soon as I piped on the Fluff. A pastry torch would have been better, but mine doesn’t work! It only takes 30-45 seconds to brown the tops nicely.

Watch cakes carefully while under the broiler...
While these cakes were a mess, I think they turned out tasty otherwise. If I were to do it over, I’d try the 7 minute frosting recipe I found on the Fluff website.

Finished Yam Casserole cupcake
I am now off to clean marshmallow Fluff out of my piping tip…and off my counters…and the stove…there may even be some on the dog…
